Decorator(@)에 대한 공부 기록이다.
개요
NestJS는 Decorator를 적극 활용하는 프레임워크다.
때문에 이에 대한 이해는 필수적이다.
데커레이터를 활용하면 횡단 관심사를 분리하여 관점 지향 프로그래밍을 적용한 코드를 작성할 수 있다.
각 요소의 선언부 앞에 @로 시작하는 데커레이터를 선언하면 데커레이터로 구현된 코드를 함께 실행한다.
관점 지향 프로그래밍
횡단 관심사의 분리(다른 관심사에 영향을 미치는 코드를 분리)를 허용하여
모듈성을 증가시키는 것이 목적인 프로그래밍 방식
//tsconfig.json
{
  "compilerOptions": {
    "experimentalDecorators": true,
  }
}
위와 같이,
tsconfig.json 파일 내의 experimentalDecorators 값이 true여야 데커레이터를 사용할 수 있다.
이번 기록의 방향성은 데커레이터를 정의하는 방법에 대해 알아보고 데커레이터의 합성이 어떻게 이뤄지는지 본 후,
타입스크립트가 지원하는 5가지 데커레이터에 대해 기록할 것이다.(클래스, 메서드, 접근자, 속성, 매개변수)
데커레이터 정의
function deco(
  target: any,
  propertyKey: string,
  description: PropertyDescriptor,
) {
  console.log('데커레이터');
}

class TestClass {
  @deco
  test() {
    console.log('함수 실행');
  }
}
const t = new TestClass();
t.test();
코드의 데커레이터는 이후에 볼 메서드 데커레이터이다. 이는 위와 같이 정의되며, 코드를 실행하면

콘솔에 사진과 동일한 로그가 찍히는 것을 볼 수 있다.
데커레이터의 구성요소에 대해서는 5가지 종류를 설명할 때 각각 자세히 다뤄보자.
데커레이터 합성
데커레이터를 실행할 때는 2가지 단계를 거치게 된다.
- 평가 (evaluate) : 데커레이터에서 반환값을 반환하기 전
- 호출 (call) : 데커레이터의 반환값
데커레이터의 합성은 수학의 함수 합성과 동일한 방법으로 이루어진다.
따라서 평가 단계는 위에서 아래, 호출 단계는 아래에서 위로 수행된다.
function f() {
  console.log('first evaluate');
  return function (
    target: any,
    propertyKey: string,
    description: PropertyDescriptor,
  ) {
    console.log('first called');
  };
}

function g() {
  console.log('second evaluate');
  return function (
    target: any,
    propertyKey: string,
    description: PropertyDescriptor,
  ) {
    console.log('second called');
  };
}

class TestClass {
  @f()
  @g()
  test() {
    console.log('method call');
  }
}
const t = new TestClass();
t.test();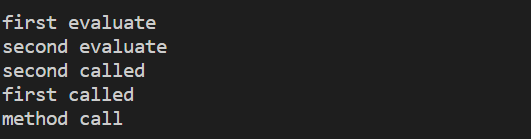
코드를 실행하니 평가는 위에서 아래, 실행은 아래에서 위로 되는 것을 확인할 수 있다.
5가지 데커레이터
이제 5가지 데커레이터에 대해 자세히 알아보자.
클래스 데커레이터
클래스 바로 앞에 선언되는 데커레이터이다.
클래스의 생성자에 적용되어 클래스 정의를 읽거나 수정할 수 있다.
정의 파일과 정의 클래스 내에서는 사용할 수 없다.
아래는 정의 파일에 대한 기록이다.
[TS] tsconfig.json,정의 파일(d.ts),JSDocs
tsconfig.json파일, 정의 파일(d.ts)과 JSDocs에 대해 공부한 기록을 남기려고 한다. tsconfig.json 먼저 프로젝트를 생성해준다. $ npm init -y 그리고 tsconfig.json 파일을 생성해준다. //tsconfig.json { "include": ["src"
choi-records.tistory.com
아래 코드는 생성한 클래스에 reportingURL 속성을 추가하는 클래스 데커레이터의 예시이다.
function reportableClassDecorator<T extends { new (...args: any[]) }>(constructor: T)
//클래스 데커레이터 팩터리이다. 생성자 타입을 상속받는 제너릭 타입 T를 가지는 생성자를 팩터리 메서드의 인수로 전달하고 있다.
{
  return class extends constructor {
  //클래스 데커레이터는 생성자를 리턴하는 함수여야 한다.
    reportingURL = 'http://www.example.com';
    //해당 클래스 데커레이터가 적용되는 클래스에 새로운 reportingURL이라는 새로운 속성을 추가한다.
  };
}

@reportableClassDecorator
class TestClass {
  type = 'report';
  title = 'test';
}

const t = new TestClass();
console.log(t);
코드 주석에서 볼 수 있듯 클래스 데커레이터는 생성자를 반환하는 함수여야 한다.
메서드 데커레이터
메서드 바로 앞에 선언된다.
메서드의 서술자(속성의 특성을 설명하는 객체)에 적용되고, 메서드의 정의를 읽거나 수정할 수 있다.
앞서 만들었던 deco 데커레이터에서 볼 수 있듯
메서드 데커레이터는 3가지의 인수를 가진다.
- target : 정적 멤버가 속한 클래스의 생성자 함수이거나, 인스턴스 멤버에 대한 클래스의 포로토타입
- propertyKey : 멤버의 이름
- description : 멤버의 속성 설명자. type은 PropertyDescriptor이다.
function HandleError() {
  return function (
    target: any,
    propertyKey: string,
    descriptor: PropertyDescriptor,
  )
  //메서드 데커레이터가 가져야 하는 3개의 인수
  {
    console.log(target);
    //{constructor : f, hello : f}
    console.log(propertyKey);
    //'hello'
    console.log(descriptor);
    /*
    {
  value: [Function: hello],
  writable: true,
  enumerable: false,
  configurable: true
  }
  */
    const method = descriptor.value;
	//원래 정의된 method를 변수에 저장
    descriptor.value = function () {
      try {
        method();
        //method 실행
      } catch (e) {
        console.log(e);
        //error handling logic
        //test error 출력
      }
    };
  };
}

class Greeter {
  @HandleError()
  hello() {
    throw new Error('test Error');
  }
}

const t = new Greeter();
t.hello();- PropertyDescriptor의 interface를 보자.
interface PropertyDescriptor {
    configurable?: boolean;
    //속성의 정의를 수정할 수 있는지 여부
    enumerable?: boolean;
    //열거형인지 여부
    value?: any;
    //속성 값
    writable?: boolean;
    //수정 가능 여부
    get?(): any;
    //getter
    set?(v: any): void;
    //setter
}
접근자 데커레이터
접근자 데커레이터는 접근자 바로 앞에 선언한다.
여기서 접근자는 getter와 setter 함수를 말한다.(객체 프로퍼티에 접근할 수 있는 메서드)
예제로 객체 프로퍼티에 접근하는 접근자를 생성하고
접근자 각각의 enumarable을 설정함으로써 getter 함수를 열거 가능하게 하고,
setter 함수는 열거가 불가능하게 수정해 보자.
function Enumerable(enumerable: boolean)
//enumerable 값을 인자로 받도록 한다.
{
  return function (
    target: any,
    propertyKey: string,
    descriptor: PropertyDescriptor,
  ) {
    descriptor.enumerable = enumerable;
  };
}

class Person {
  constructor(public name: string) {}

  @Enumerable(true)
  //getter 메서드는 열거 가능하게 설정
  get getName() {
    return this.name;
  }

  @Enumerable(false)
  //setter 메서드는 열거 불가능하게 설정
  set setName(name: string) {
    this.name = name;
  }
}

const person = new Person('Choi');
for (let key in person) {
  console.log(`${key}: ${person[key]}`);
}
결과는 아래와 같다.

속성 데커레이터
클래스의 속성 바로 앞에 선언된다.
속성 데커레이터는 두 개의 인수를 가지는 함수이다.
- target : 정적 멤버가 속한 클래스의 생성자 함수이거나 인스턴스 멤버에 대한 클래스의 프로토타입
- propertyKey : 멤버의 이름
메서드 데커레이터의 target과 propertyKey를 인수로 가진다.
function format(formatString: string) {
  return function (target: any, propertyKey: string): any {
    let value = target[propertyKey];
    function getter() {
      return `${formatString} ${value}`;
      //getter에서 데커레이터 인수로 들어온 formatString을 원래 속성과 조합한 스트링으로 바꿈
    }
    function setter(newVal: string) {
      value: newVal;
    }
    return {
      get: getter,
      set: setter,
      enumerable: true,
      configurable: true,
    };
  };
}

class Greeter {
  @format('Hello')
  //formString 전달
  greeting: string;
}

const t = new Greeter();
t.greeting = 'World';
console.log(t.greeting);
//getter 호출에 따라 Hello World 출력
매개변수 데커레이터
생성자 또는 메서드의 매개변수에 선언되어 적용
3가지 인수를 가진다.
- target
- propertyKey
- parameterIndex : 매개변수가 함수에서 몇 번째 위치에 선언되었는지를 나타내는 인덱스
유효성을 검사하는 예제를 통해 매개변수 데커레이터를 사용해 보자.
import { BadRequestException } from '@nestjs/common/exceptions';

function MinLength(min: number) {
  //매개변수의 최솟값을 검사하는 매개변수 데커레이터
  return function (target: any, propertyKey: string, parameterIndex: number) {
    target.validators = {
      //target class의 validators 속성에 유효성 검사 함수를 할당
      minLength: function (args: string[]) {
        //args 인수는 Validate 메소드에서 넘겨받을 인수
        return args[parameterIndex].length >= min;
        //유효성 검사 결과를 반환
      },
    };
  };
}

function Validate(
  target: any,
  propertyKey: string,
  descriptor: PropertyDescriptor,
) {
  const method = descriptor.value;
  //데커레이터가 선언된 메소드를 변수에 저장
  descriptor.value = function (...args) {
    //value에 유효성 검사 로직이 추가된 함수 할당
    Object.keys(target.validators).forEach((key) => {
      //target에 저장해둔 validators를 모두 수행. 이때 원래 메서드에 전달된 인수들은 각 validator에 전달
      if (!target.validators[key](args)) {
        throw new BadRequestException();
      }
    });
    method.apply(this, args);
  };
}

class User {
  private name: string;
  @Validate
  setName(@MinLength(3) name: string) {
    this.name = name;
  }
}
const t = new User();
t.setName('Choi');
console.log('------------------');
t.setName('De');
'Backend > NestJS' 카테고리의 다른 글
| [NestJS]User API 만들기(2) (Provider 프로바이더 회원가입 구현) (1) | 2022.12.29 |
|---|---|
| [NestJS] User API 만들기(1)(Controller, 컨트롤러) (1) | 2022.12.28 |
| [NestJS] 프레임워크와 라이브러리의 차이, 필수 기능 (0) | 2022.12.20 |
| [NestJS Overview] NestJS jest로 테스트하기(2) (e2e testing) (1) | 2022.12.09 |
| [NestJS Overview] NestJS jest로 테스트하기(1) (unit testing) (0) | 2022.12.07 |


